2021/12/19

Laravel では、DIコンテナ(サービスコンテナ)を中心としてフレームワークが作られています。
(※5.2では Illuminate\Contracts\Foundation\Applicationクラスが DIコンテナにあたります。)
DIコンテナの "DI" とは 依存性の注入 という言葉に訳されています。
今回はLaravelの作りを理解できるように "依存性の注入" についてエントリーします。
依存性の注入とは
"依存性の注入" とは英語で "Dependency Injection" と書きます。
ちまたではよく "DI" と言われたりします。
日本語で「依存性」と言うと、「依存性はコカイン並み」「ニコチンは依存性薬物」のような用法で使われています。
それの "注入" ですから、言葉だけにフォーカスをあてると意味がわかりません。
英語版のWikipediaをみると "Dependency" とは "依存" ではなく"サービスとして利用するオブジェクト"として定義されています。
A dependency is an object that can be used (a service).
Dependency injection from en.wiki
そして "注入" とはあるオブジェクトを別のオブジェクトに渡して使うことをいいます。
An injection is the passing of a dependency to a dependent object (a client) that would use it.
Dependency injection from en.wiki
つまり DI とは、「依存性の注入」として理解するよりも「依存している部分を、外から注入すること」と捉えるほうがわかりやすいかもしれません。
サンプルコードを書いて理解をすすめていきます。
サンプル
DIパターンでないコード例
DIパターンでないコードは「依存関係のあるコードをクラス内で生成すること」を言います。
<?php
class Dog
{
  public function barks()
  {
    $cat =new Cat();
    $cat->meow();
  }
}
上記のソースコードはDogクラス内でCatクラスのインスタンスが生成されています。
これをやってしまうと、DogクラスはCatクラスに強く依存してしまうため、単体テストができません。(=拡張性がない)
DIはクラスの中で new をしません。
必要なインスタンスは外から突っ込むようにします。
DIパターンのコード例
DIは、あるオブジェクトが他のオブジェクトを外から注入しようというものです。
注入のやり方は3種類あります。
2)セッタ・インジェクション
3)コンストラクタ・インジェクション
1)メソッド・インジェクション
メソッドの引数に依存対象のクラスを渡すことを "メソッド・インジェクション" といいます。
<?php
class Dog
{
  public function barks(Cat $cat)
  {
    $cat->meow();
  }
}

$cat = new Cat();
$dog = new Dog();
$dog ->barks($cat);
2)セッタ・インジェクション
DI用のセッタを用意し依存対象のクラスを渡すことを "セッタ・インジェクション" といいます。
<?php
class Dog
{
  private $cat;
  public function setCat(cat $cat)
  {
    $this->cat = $cat;
  }
  public function barks()
  {
    $this->cat->meow();
  }
}

$cat = new Cat();
$dog = new Dog();
$dog->setCat($cat);
$dog->barks();
3)コンストラクタ・インジェクション
コンストラクタに依存対象のクラスを渡すことを "コンストラクタ・インジェクション" といいます。
<?php
class Dog
{
  private $cat;
  public function __construct(Cat $cat)
  {
    $this->cat = $cat;
  }
  public function barks()
  {
    $this->cat->meow();
  }
}

$cat = new Cat();
$dog = new Dog($cat);
$dog->barks();
チュートリアル
実際のサンプルコードをコーディングしながらDIについて理解を深めていきます。
今回はLaravelでは作成しません。純粋なPHPでコーディングします。
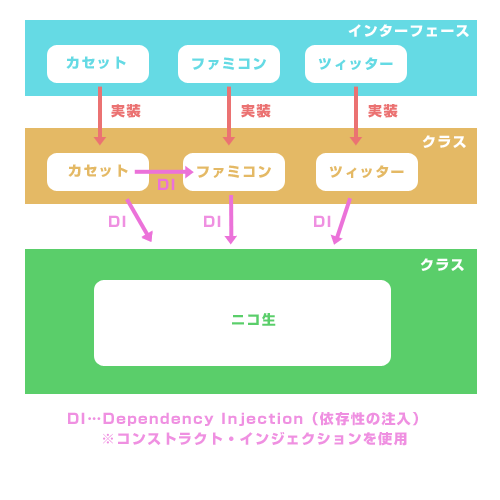
設計
手順
1)インターフェースの定義
2)インターフェースの実装
3)クラスの作成(DI)
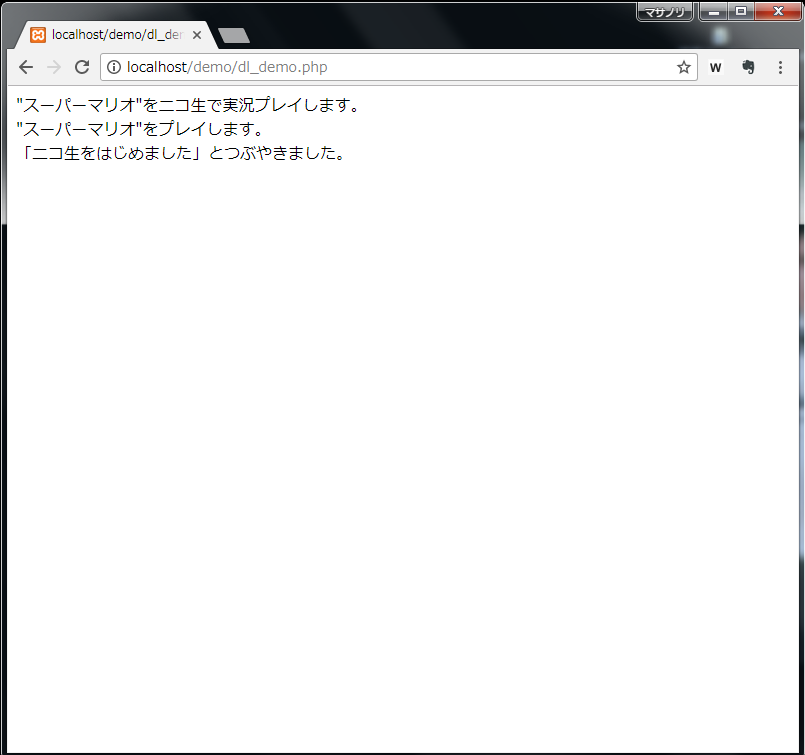
4)実行
5)動作確認
1)インターフェースの定義
<?php
//カセット
interface CassetteInterface
{
  public function getTitle();
}

//ファミコン
interface FamikonInterface
{
  public function play();
}

//ツィッター
interface TwitterClientInterface
{
  public function post();
}
:
2)インターフェース実装
:
//カセット
class Cassette implements CassetteInterface
{

  public function __construct($title=null)
  {
  $this->title = $title;
  }

  public function getTitle()
  {
  return $this->title;
  }

}

//ファミコン
class Famikon implements FamikonInterface
{
  private $cassette;

  public function __construct(CassetteInterface $cassette)
  {
  $this->cassette = $cassette;
  }

  public function play()
  {
  echo '"'.$this->cassette->getTitle().'"をプレイします。<br>';
  }
}

  //ツィッター
class TwitterClient implements TwitterClientInterface
{
 public function post()
 {
  echo '「ニコ生をはじめました」とつぶやきました。<br>';
 }
}
:
3)クラスの作成(DI)
:
//ニコ生
class Nikonama
{
  private $cassette;
  private $famikon;
  private $twitter_client;

  public function __construct(CassetteInterface $cassette,FamikonInterface $famikon, TwitterClientInterface $twitter_client)
  {
  $this->cassette = $cassette;
  $this->famikon = $famikon;
  $this->twitter_client = $twitter_client;
  }

  public function play()
  {
  echo '"'.$this->cassette->getTitle().'"をニコ生で実況プレイします。<br>';
  $this->famikon->play();
  }

  public function tweet()
  {
  $this->twitter_client->post();
  }
}
:
4)実行
:
$cassette = new Cassette('スーパーマリオ');
$famikon = new Famikon($cassette);
$twitter_client = new TwitterClient();
$nikonama = new Nikonama($cassette,$famikon,$twitter_client);
$nikonama->play();
$nikonama->tweet();
5)動作確認
http://{ホスト名}/demo/di_demo.php にアクセス
以上です。
仕事で Laravel を使っています。気づいたことや新しい発見など情報を発信していきます。問い合わせはこちら。


