2022/04/25

前回、LaravelでCSVエキスポートの記事をエントリーしました。
CSVエキスポートの作成(ステップ3:CSVエキスポート機能の作成)
この流れで今回はCSVインポートの機能を作成してみます。
CSVインポート/エキスポート の処理はPHPの関数で作成するやり方とライブラリを利用するやり方の2つあります。
この記事ではライブラリ(goody/csv)を使ってCSVファイルをインポートします。
LaravelでCSVインポートを考察中
PHPライブラリ goodby/csvhttps://t.co/W4zDlrIMHy出来たらまたブログにUPします😀
— 本庄 マサノリ (@honjo_masanori) August 20, 2019
>>フォローする
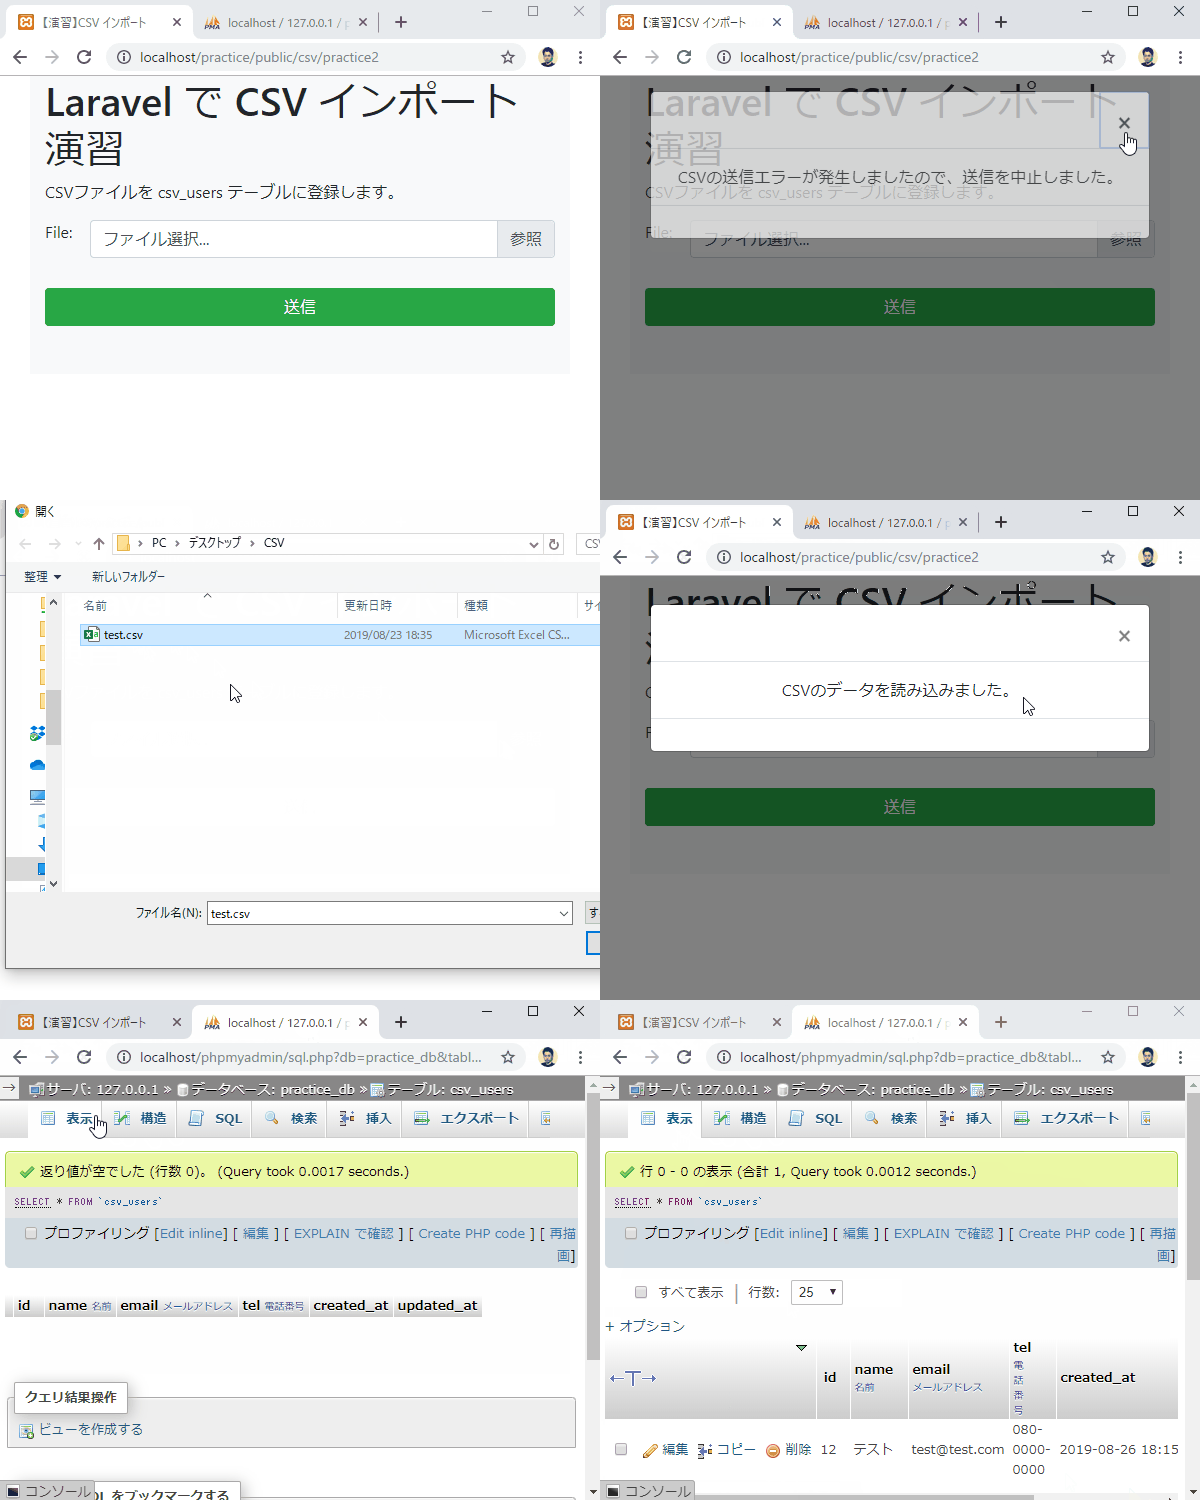
完成形

仕様
CSV(test.csv)

DBテーブル構成

手順
テーブル作成
artisanコマンドでスケルトンを作成。
php artisan make:migration create_csv_users_table --create=csv_users
自動生成されたスケルトンに中身を入れていきます。
public function up()
{
    Schema::create('csv_users', function (Blueprint $table) {
        $table->increments('id');
        $table->string('name')->comment('名前');
        $table->string('email')->comment('メールアドレス');
        $table->string('tel',20)->nullable()->comment('電話番号');
        $table->timestamps();
    });
}
作成したマイグレーションファイルを実行。
php artisan migrate
よくやる打ち間違うartisanコマンド その1
php artisan make:migrate
(正解:php artisan migrate)#laravel #artisanコマンド— 本庄 マサノリ (@honjo_masanori) August 21, 2019
モデル作成
モデルのスケルトンを作成。
php artisan make:model Models/CsvUser
中身を入れてきます。
class CsvUser extends Model
{
    //ブラックリスト方式
    protected $guarded = ['id'];
}
Bladeファイル作成
フォーム
Bootstrap4のファイルを選択するコンポーネントを使いました。ファイル名はpractice2.blade.php。
<h1>Laravel で CSV インポート 演習</h1>
    <p>CSVファイルを csv_users テーブルに登録します。</p>
    <form action="" method="post" enctype="multipart/form-data">
        {{ csrf_field() }}
        <div class="row">
            <label class="col-1 text-right" for="form-file-1">File:</label>
            <div class="col-11">
                <div class="custom-file">
                    <input type="file" name="csv" class="custom-file-input" id="customFile">
                    <label class="custom-file-label" for="customFile" data-browse="参照">ファイル選択...</label>
                </div>
            </div>
        </div>
        <button type="submit" class="btn btn-success btn-block">送信</button>
    </form>
ファイルを選択すると、入力フォーム部分にファイル名を表示するためには以下のjQueryも必要です。末尾に記述します。
:
<script>
    // ファイルを選択すると、入力フォーム部分にファイル名を表示
    $('.custom-file-input').on('change',function(){
        $(this).next('.custom-file-label').html($(this)[0].files[0].name);
    })
</script>
</body>
</html>
フラッシュメッセージ
CSVインポートが完了したらフラッシュメッセージを表示させます。
@if(Session::has('flashmessage'))
<script>
$(window).on('load',function(){
$('#myModal').modal('show');
});
</script>
<!-- モーダルウィンドウの中身 -->
<div class="modal fade" id="myModal" tabindex="-1"
role="dialog" aria-labelledby="label1" aria-hidden="true">
<div class="modal-dialog" role="document">
<div class="modal-content">
<div class="modal-header">
<button type="button" class="close" data-dismiss="modal" aria-label="Close">
<span aria-hidden="true">×</span>
</button>
</div>
<div class="modal-body text-center">
{{ session('flashmessage') }}
</div>
<div class="modal-footer text-center">
</div>
</div>
</div>
</div>
@endif
PHPライブラリ「Goodby CSV」ライブラリをインストール
composer require goodby/csv
ルーティング&コントローラ作成
ルーティング
コントローラは前回作成したCSVダウンロードのコントローラに追記しました。
厳密にはCSVアップロードになるので、気になるかたは新しいコントローラを作成してください。
Route::get('csv/practice2', 'CsvDownloadController@practice2'); //表示
Route::post('csv/practice2', 'CsvDownloadController@upload_regist'); //登録
コントローラ(表示)
public function practice2()
{
    return view('csv.practice2');
}
コントローラ(CSVインポート処理)
この記事のメインになるところですね。
// use 宣言を追加
use Goodby\CSV\Import\Standard\LexerConfig;
use Goodby\CSV\Import\Standard\Lexer;
use Goodby\CSV\Import\Standard\Interpreter;
:
public function upload_regist(Request $rq)
{
    if($rq->hasFile('csv') && $rq->file('csv')->isValid()) {
        // CSV ファイル保存
        $tmpname = uniqid("CSVUP_").".".$rq->file('csv')->guessExtension(); //TMPファイル名
        $rq->file('csv')->move(public_path()."/csv/tmp",$tmpname);
        $tmppath = public_path()."/csv/tmp/".$tmpname;

        // Goodby CSVの設定
        $config_in = new LexerConfig();
        $config_in
            ->setFromCharset("SJIS-win")
            ->setToCharset("UTF-8") // CharasetをUTF-8に変換
            ->setIgnoreHeaderLine(true) //CSVのヘッダーを無視
        ;
        $lexer_in = new Lexer($config_in);

        $datalist = array();

        $interpreter = new Interpreter();
        $interpreter->addObserver(function (array $row) use (&$datalist){
           // 各列のデータを取得
           $datalist[] = $row;
        });

        // CSVデータをパース
        $lexer_in->parse($tmppath,$interpreter);

        // TMPファイル削除
        unlink($tmppath);

        // 処理
        foreach($datalist as $row){
            // 各データ取り出し
            $csv_user = $this->get_csv_user($row);

            // DBへの登録
            $this->regist_user_csv($csv_user);
        }
        return redirect('/csv/practice2')->with('flashmessage','CSVのデータを読み込みました。');
    }
    return redirect('/csv/practice2')->with('flashmessage','CSVの送信エラーが発生しましたので、送信を中止しました。');
}
解説
インポートの流れは以下のようになります。
2.Goodby/CSV の config設定
3.Goodby/CSV ライブラリでCSVデータをパース
4.get_csv_userメソッドでkeyとCSVデータを配列にセット
5.regist_user_csvメソッドでDBに保存
コントローラ(get_csv_user)
private function get_csv_user($row)
{
    $user = array(
        'name' => $row[0],
        'email' => $row[1],
        'tel' => $row[2],
    );
    return $user;
}
コントローラ(regist_user_csv)
private function regist_user_csv($user)
{
    $newuser = new \App\CsvUser;
    foreach($user as $key => $value){
        $newuser->$key = $value;
    }
    $newuser->save();
}
以上です。
次回はこのソースにCSVデータのバリデーション機能をつけてみようと思います。
仕事で Laravel を使っています。気づいたことや新しい発見など情報を発信していきます。問い合わせはこちら。