2018/10/12

Laravel ではデフォルトで Blade(ブレイド) というテンプレートエンジンが組み込まれてます。
ビューを作成する場合はこの Blade テンプレートエンジンを使います。
今回は Blade について記事をエントリーします。
Blade とは
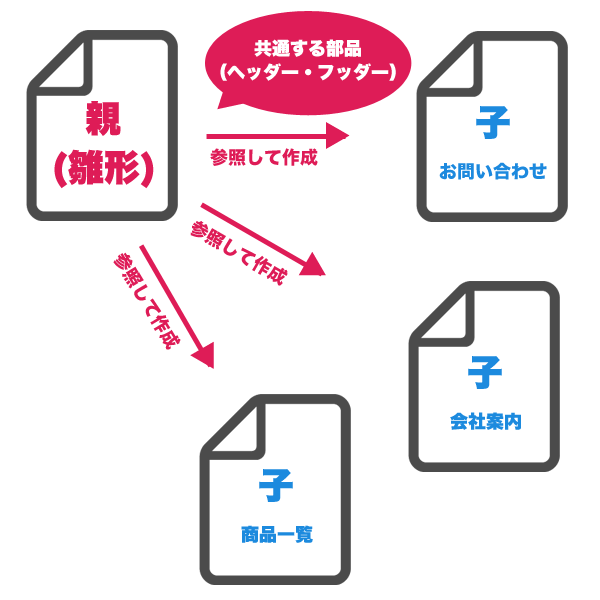
Blade とはクラスのように階層化したテンプレートエンジンです。
ヘッダーやフッターなどの決まりきった共通部分は基底のテンプレート(親ビュー)に定義して、body の中だけを(子ビュー)で定義するといった使い方をします。
実際にどのような記述をするのかサンプルコードを確認してみます。
親ビューは以下のように共通部品だけ記述します。
<!doctype html>
<html lang="ja">
<head>
  <meta charset="UTF-8">
  <title>@yield('title')</title>
  <link rel="stylesheet" href="css/common.css"/>
  @yield('stylesheet')
</head>
<body>
  @yield('content');
</body>
</html>
Bladeテンプレートを使うにはファイルの拡張子をXXX.blade.phpとしておく必要があります。
子ビューは親ビューを参照して固有の部品だけ記述します。
@extends('layouts.master')
@section('title', 'お問い合わせ')
@section('stylesheet')
  <link rel="stylesheet" href="css/toiawase.css"/>
@endsection
@section('content')
  <h1>お問合せフォームです</h1>
  <form>
  :
 </form>
@endsection
以下、解説していきます。
子ビューの1行目の @extends(‘layouts.master’) を書くことで、親ビューである resources/views/layouts/master.blade.php ファイルを継承することができます。
そして、小ビューの @section(‘content’) から @endsection の間の記述が親ビューの @yield(‘content’) に出力されることになります。
他にページを作るときも、この親ビュー(layout/master.blade.php)を継承します。
そうすることで共通の記述は省略でき、各ページは固有の箇所だけで記述が済みます。
例えば共通するCSSは親ビューに記述し、
:
<link rel="stylesheet" href="css/common.css"/>
@yield('stylesheet')
:
固有のCSSだけ
:
@section('stylesheet')
  <link rel="stylesheet" href="css/toiawase.css"/>
@endsection
:
このように指定します。
チュートリアル
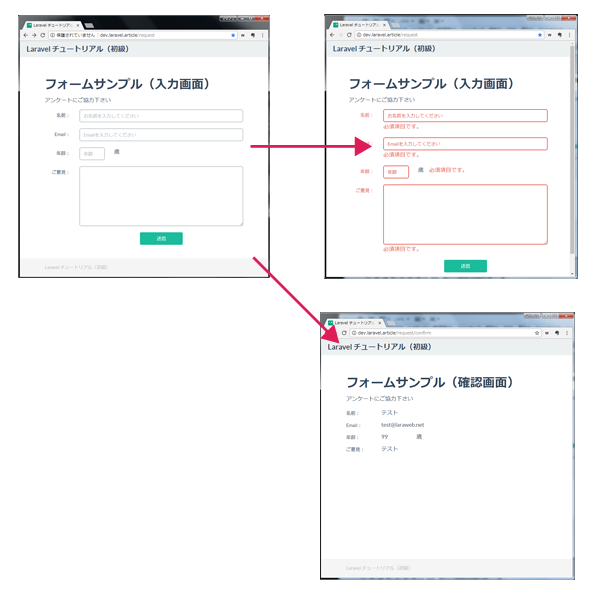
前回作成したフォームのサンプルをカスタマイズします。
親ビューと子ビューに分けてデザインをのせていきます。
デモページはコチラ
手順
1)親ビューの作成
2)子ビューの作成
1.入力フォーム
2.確認画面
3)動作確認
1)親ビューの作成
お作法通りにやるなら親ビューは resouces/views/layouts に作成します。
<!DOCTYPE HTML>
<html lang="ja">
<head>
  <meta charset="utf-8">
  <meta http-equiv="X-UA-Compatible" content="IE=edge">
  <meta name="viewport" content="width=device-width, initial-scale=1">
  <title>@yield('title')</title>
  <link href="{{ url('/') }}/dist/css/vendor/bootstrap/css/bootstrap.min.css" rel="stylesheet"><!-- Loading Bootstrap -->
  <link href="{{ url('/') }}/dist/css/flat-ui.min.css" rel="stylesheet"><!-- Loading Flat UI -->
  <link href="{{ url('/') }}/css/starter-template.css" rel="stylesheet"><!--Bootstrap theme(Starter)-->
  <link rel="shortcut icon" href="{{ url('/') }}/dist/img/favicon.ico">

  <!--[if lt IE 9]>
  <script src="https://oss.maxcdn.com/html5shiv/3.7.2/html5shiv.min.js"></script>
  <script src="https://oss.maxcdn.com/respond/1.4.2/respond.min.js"></script>
  <![endif]-->

  @yield('styles')
  <link href="http://netdna.bootstrapcdn.com/font-awesome/4.6.3/css/font-awesome.css" rel="stylesheet"><!-- FontAwesome -->

</head>
<body>

<!--=================================================
Navbar
==================================================-->

<nav class="navbar navbar-default navbar-fixed-top" role="navigation">
  <div class="container-fluid">
  <!-- スマートフォンサイズで表示されるメニューボタンとテキスト -->
  <div class="navbar-header">
  <!-- タイトルなどのテキスト -->
  <a class="navbar-brand" href="#">@yield('title')</a>
  </div>
  </div>
</nav>

<div class="container" style="margin-top: 40px;">
  @yield('content')
</div><!-- /.container -->

<footer class="footer">
  <div class="container">
  <p class="text-muted">@yield('title')</p>
  </div>
</footer>

<!-- Bootstrap core JavaScript
  ================================================== -->
<script src="{{ url('/') }}/dist/js/vendor/jquery.min.js"></script>
<script src="{{ url('/') }}/dist/js/vendor/video.js"></script>
<script src="{{ url('/') }}/dist/js/flat-ui.min.js"></script>

<script src="{{ url('/') }}/assets/js/prettify.js"></script>
<script src="{{ url('/') }}/assets/js/application.js"></script>

@yield('scripts')
</body>
</html>
2)子ビューの作成
1.入力フォーム
@extends('layouts.master_request')
@section('title', 'Laravel チュートリアル(初級)')

@section('content')
<h3>フォームサンプル(入力画面)</h3>
<p>アンケートにご協力下さい</p>

<form action="{{ route('request.confirm') }}" method="post" class="form-horizontal">
  <div class="form-group @if($errors->has('username')) has-error @endif">
  <label class="col-sm-2 control-label" for="username">名前:</label>
  <div class="col-sm-10">
  <input type="text" class="form-control" id="username" name="username" placeholder="お名前を入力してください" value="{{ old('username') }}">
  @if($errors->has('username'))<span class="text-danger">{{ $errors->first('username') }}</span> @endif
  </div>
  </div>
  <div class="form-group @if($errors->has('mail')) has-error @endif">
  <label class="col-sm-2 control-label" for="mail">Email:</label>
  <div class="col-sm-10">
  <input type="text" class="form-control" id="mail" name="mail" placeholder="Emailを入力してください" value="{{ old('mail') }}">
  @if($errors->has('mail'))<span class="text-danger">{{ $errors->first('mail') }}</span> @endif
  </div>
  </div>
  <div class="form-group @if($errors->has('age')) has-error @endif">
  <label class="col-sm-2 control-label" for="age">年齢:</label>
  <div class="col-sm-2">
  <input type="text" class="form-control" id="age" name="age" placeholder="年齢" value="{{ old('age') }}">
  </div>
  <div class="col-sm-8">歳 @if($errors->has('age'))<span class="text-danger">{{ $errors->first('age') }}</span> @endif</div>
  </div>
  <div class="form-group @if($errors->has('opinion')) has-error @endif">
  <label class="col-sm-2 control-label" for="opinion">ご意見:</label>
  <div class="col-sm-10">
  <textarea name="opinion" rows="8" cols="40" class="form-control">{{ old('opinion') }}</textarea>
  @if($errors->has('opinion'))<span class="text-danger">{{ $errors->first('opinion') }}</span> @endif
  </div>
  </div>
  <div class="form-group">
  <div class="col-sm-offset-2 col-sm-10 text-center">
  <input type="submit" name="button1" value="送信" class="btn btn-primary btn-wide" />
  </div>
  </div>
  <input type="hidden" name="_token" value="{{ csrf_token() }}">
</form>
@endsection
2.確認画面
@extends('layouts.master_request')
@section('title', 'Laravel チュートリアル(初級)')

@section('content')
  <h3>フォームサンプル(確認画面)</h3>
  <p>アンケートにご協力下さい</p>

  <div class="row">
  <label class="col-sm-2 control-label" for="username">名前:</label>
  <div class="col-sm-10">{{$username}}</div>
  </div>
  <div class="row">
  <label class="col-sm-2 control-label" for="mail">Email:</label>
  <div class="col-sm-10">{{$mail}}</div>
  </div>
  <div class="row">
  <label class="col-sm-2 control-label" for="age">年齢:</label>
  <div class="col-sm-2">{{$age}}</div>
  <div class="col-sm-8">歳</div>
  </div>
  <div class="row">
  <label class="col-sm-2 control-label" for="opinion">ご意見:</label>
  <div class="col-sm-10">{{$opinion}}</div>
  </div>
@endsection
3)動作確認
http://{ホスト}/request にアクセス
以上です。
仕事で Laravel を使っています。気づいたことや新しい発見など情報を発信していきます。問い合わせはこちら。

