2021/10/09

前回はDBのテーブルを作成し、サンプルデータの挿入をしました。
CRUDアプリの作成 STEP2:「DBテーブル」「シーダー」の作成
今回はサンプルデータを抽出し表示をしてみます。
今回のゴール
【 今回の作業 】
・ルーティングの設定
・コントローラの作成
・ビューの作成
手順
手順
1)ルーティングの設定
routes/web.php に以下のようにルーティングの記述をします。
:
Route::get('crud/', 'CrudController@getIndex');
2)コントローラの作成
artisanコマンドでコントローラのスケルトンを作成します。
php artisan make:controller CrudController
作成されたスケルトンに中身を入れていきます。
public function getIndex()
{
     $query = \App\Student::query();

     // 全件取得 +ページネーション
     $students = $query->orderBy('id','desc')->paginate(5);
     return view('student.list')->with('students',$students);
}
3)ビューの作成
ビューは STEP1 で作成したビューを使います。
下記はループで表示させる箇所だけ抜粋しました。
<!--テーブル-->
<div class="table-responsive">
<table class="table" style="width: 1000px; max-width: 0 auto;">
   <tr class="table-info">
     <th scope="col" width="10%">#</th>
     <th scope="col" width="15%">名前</th>
     <th scope="col" width="30%">Email</th>
     <th scope="col" width="15%">TEL</th>
     <th scope="col" width="30%" colspan="3">OPTION</th>
   </tr>

  @foreach($students as $student)
    <tr>
      <th scope="row">{{$student->id}}</th>
      <td>{{$student->name}}</td>
      <td>{{$student->email}}</td>
      <td>{{$student->tel}}</td>
      <td><button type="button" class="btn btn-success">詳細</button></td>
      <td><button type="button" class="btn btn-primary">編集</button></td>
      <td><button type="button" class="btn btn-danger">削除</button></td>
   </tr>
   @endforeach
   </table>
   </div>
   <!--/テーブル-->

<!-- ページネーション -->
{!! $students->render() !!}
4)動作確認
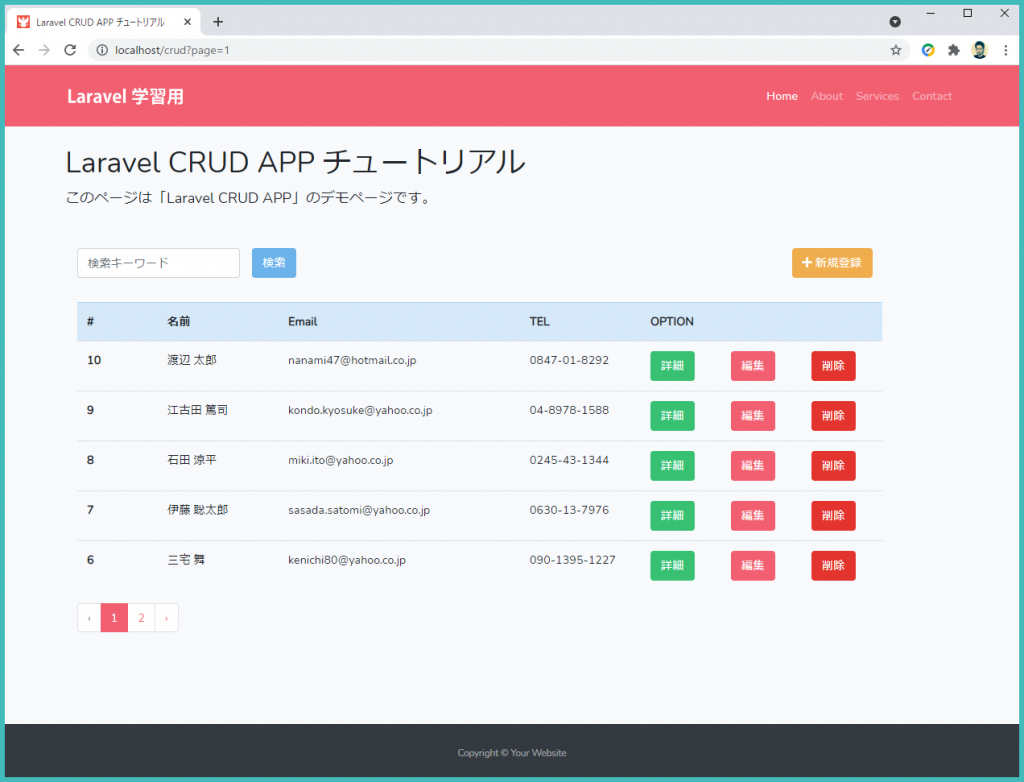
ブラウザを開いて http://localhost/crud にアクセスします。
上記のように表示されればOKです。
以上です。
仕事で Laravel を使っています。気づいたことや新しい発見など情報を発信していきます。問い合わせはこちら。
